How to Specify Moisture Content for Birch/Beech Wooden Brush Handles (And Avoid Cracking in Transit)?
Have you ever opened a shipping container of wooden brush handles only to find that half of them are warped or cracked before they even reach your assembly line?
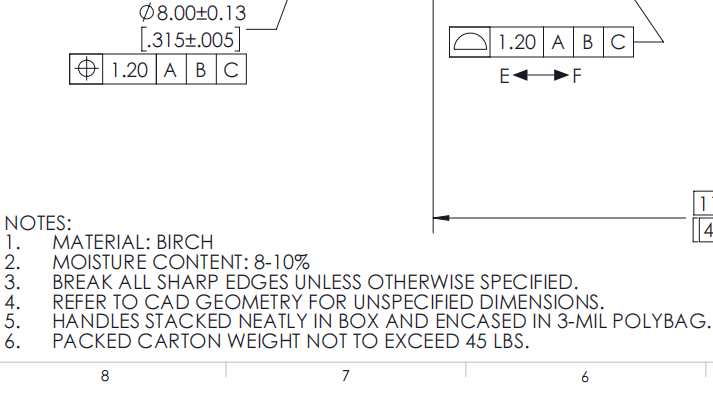
The ideal moisture content for Birch and Beech wooden brush handles is strictly between 8% and 10% to prevent dimensional instability. This range ensures the wood remains stable during ocean freight and matches the average indoor humidity of most Western manufacturing facilities, preventing loose ferrules or split handles.
Many buyers treat wood like plastic. They think once it is shaped, it stays that shape. But wood is alive. It breathes. If you do not control the water inside it, it will move. I have spent 30 years in this industry, starting as a worker on the floor and now running JDW. I have seen thousands of dollars of product ruined because a factory did not account for the humidity in the air. In this article, I will explain exactly how to specify moisture content so your production line never stops.
What moisture content to specify (for Birch vs Beech)?
If you are looking for a reliable supplier for your brush handles, the first question you must ask is about their drying process.
You must insist on a moisture content (MC) range of 8% to 10% for both Birch and Beech handles. This specific range strikes a balance: it is dry enough to prevent fungal growth and shrinkage, but retains enough moisture to prevent the wood from becoming brittle and cracking during assembly.

Why 8% to 10% is the Magic Number
Over the last three decades, I have tested countless batches of timber. We found that the 8-10% range is not a random number. It is the sweet spot for stability.
When we manufacture handles, we are fighting against nature. Wood wants to reach "Equilibrium Moisture Content" (EMC). This means it wants to match the humidity of the air around it. If your factory in Canada is dry (heated in winter) and the handle is wet (14%), the handle will shrink. If the handle shrinks, the metal ferrule becomes loose. The brush head falls off. This is a disaster for your brand image.
On the other hand, if the wood is too dry (below 6%), it becomes like glass. When your automated machine drives a nail or crimps the ferrule, the wood will split.
Here is how Birch and Beech react differently, based on my experience on the factory floor:
| Feature | Birch (Betula) | Beech (Fagus) |
|---|---|---|
| Density | Medium density. Easier to dry evenly. | High density. Very strong but moves a lot. |
| Reaction to Moisture | Moderate shrinkage. | High shrinkage (tangential). |
| Risk of Cracking | Lower risk during drying. | High risk if dried too fast. |
| Ideal Use | Standard paint brushes. | Premium tools, heavy-duty handles. |
| Production Risk | Generally stable. | Needs slower, careful drying schedules. |
The Danger of the "Plum Rain" Season
You must also consider where the handles are made. In my region of China, we have the "Plum Rain" season (Meiyu). This happens in June and July. The air becomes incredibly thick with moisture. Humidity hits 90% or more.
If your supplier does not have climate-controlled storage, dry wood will suck up moisture from the air like a sponge. A handle that was 10% on Tuesday can be 14% on Friday just by sitting in the warehouse.
The Assembly Line Nightmare: Oversized vs. Undersized
When moisture is wrong, dimensions change.
- Oversized Handles (Too Wet): If the wood has absorbed water, it swells. It might not fit into the ferrule cup. This is bad, but we can fix it. You can put these handles in a drying room (hot box) for a few days. They will shrink back down. It causes a delay, but not a total loss.
- Undersized Handles (Too Dry): This is the dangerous one. If the wood is too dry, it shrinks. The handle fits into the ferrule easily—too easily. It is loose. When your machine tries to crimp it or nail it, the ferrule might pierce the wood grain because there is a gap. Or worse, the handle spins inside the ferrule. This leads to high rejection rates and jams in your automated feeders.
Read more about our Manufacturing Process and Kiln Drying Technologies.
How to measure moisture content (so the numbers mean something)?
Writing a number on a contract is easy. Proving that the product meets that number is harder.
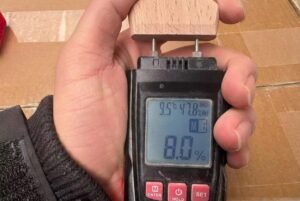
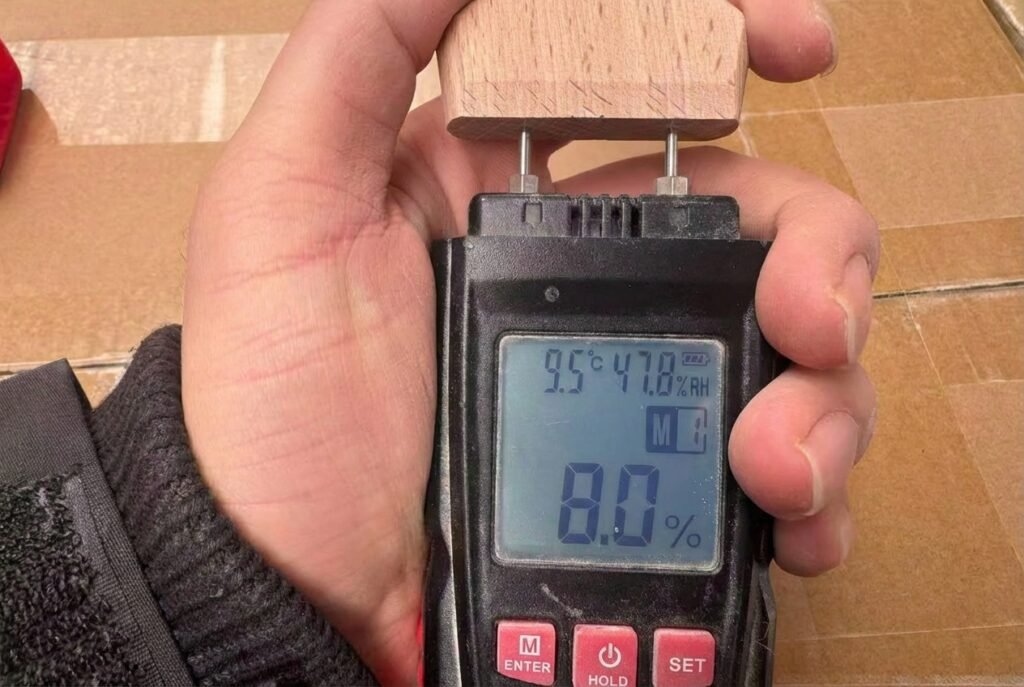
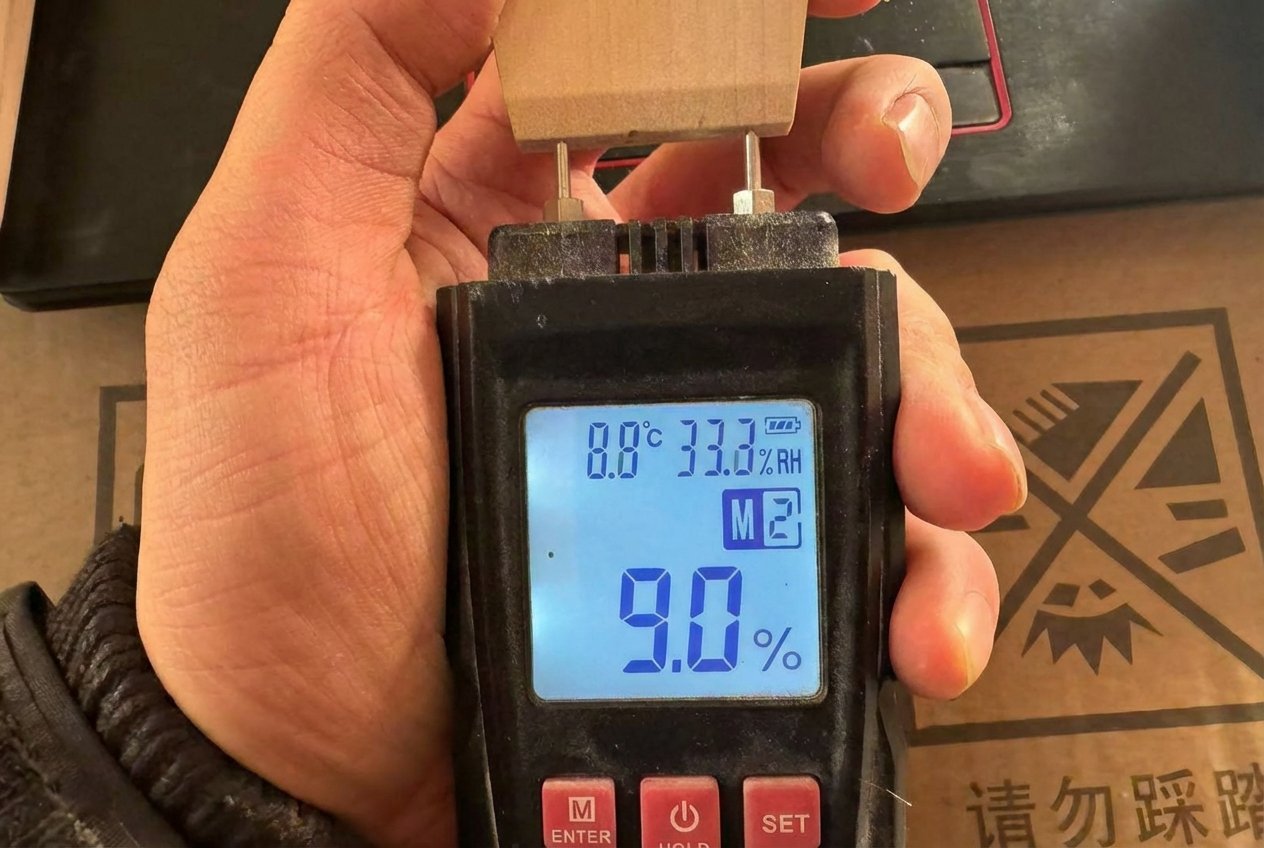
We measure moisture by inserting the pins of a professional moisture meter directly into the head of the handle (the part covered by the ferrule). This gives an accurate core reading without damaging the visible finish, ensuring the data reflects the true state of the wood.
The Three Critical Checkpoints
I often tell my team: "You cannot inspect quality into a product; you must build it in." However, with moisture, you must inspect constantly. We test at three distinct stages. If you are visiting a factory, ask to see the logs for all three.
- Post-Kiln Check: Right after the raw lumber leaves the drying kiln. We check to see if the drying was even. If the center of the board is wet but the outside is dry (case hardening), the wood will warp later when we cut it.
- Pre-Packaging Check: Before we put the finished handles into boxes. This is the most important check for you. This confirms the wood is stable before it is sealed away.
- Pre-Shipment Check: Just before the container doors close. We generate a report here.
Where to Stick the Pins?
There are two types of meters: pin and pinless. Pinless meters are fast but can be affected by surface density. Pin meters are accurate but leave holes.
For brush handles, we must use pin meters for accuracy. But we cannot ruin the "European quality" finish. So, where do we test?
We insert the pins into the Head of the Handle. This is the tapered end that goes inside the metal ferrule. The holes will be covered by the metal and the glue (epoxy). The consumer will never see them. This allows us to get a deep reading of the core moisture without destroying the product aesthetics.
The Inspection Standard: GB2828.1-2003
When I work with large global enterprises (like the "Risk-Averse Procurement Veteran"), they need a standardized way to accept or reject goods. We cannot just test five handles and say "it is good."
I recommend using GB2828.1-2003 (equivalent to ISO 2859-1).
- Inspection Level: SII (Special Inspection Level 2). This is appropriate for destructive or semi-destructive testing.
- AQL (Acceptable Quality Limit): 2.5.
What does AQL 2.5 mean in practice?
It means that in a batch of handles, a small statistical deviation is allowed, but it is very tight. If we find moisture readings outside the 8-10% range in more than the allowed number of samples, the entire lot must be re-dried or rejected.
My Advice for Your Receiving Team:
When the container arrives at your factory, do not wait. Open a carton immediately. Check the humidity in your own warehouse. If your warehouse is very humid, and you open dry handles, they will start absorbing water immediately.
The Golden Rule: Assemble the ferrule and the wooden handle on the same day you open the moisture-barrier cartons. Once the ferrule is glued and crimped, the wood is mechanically locked. It cannot move as much. If you open the boxes and wait two weeks to assemble, you are inviting trouble.
The Hidden Danger: Ocean Freight and Container Rain
Most people do not realize that it rains inside shipping containers.
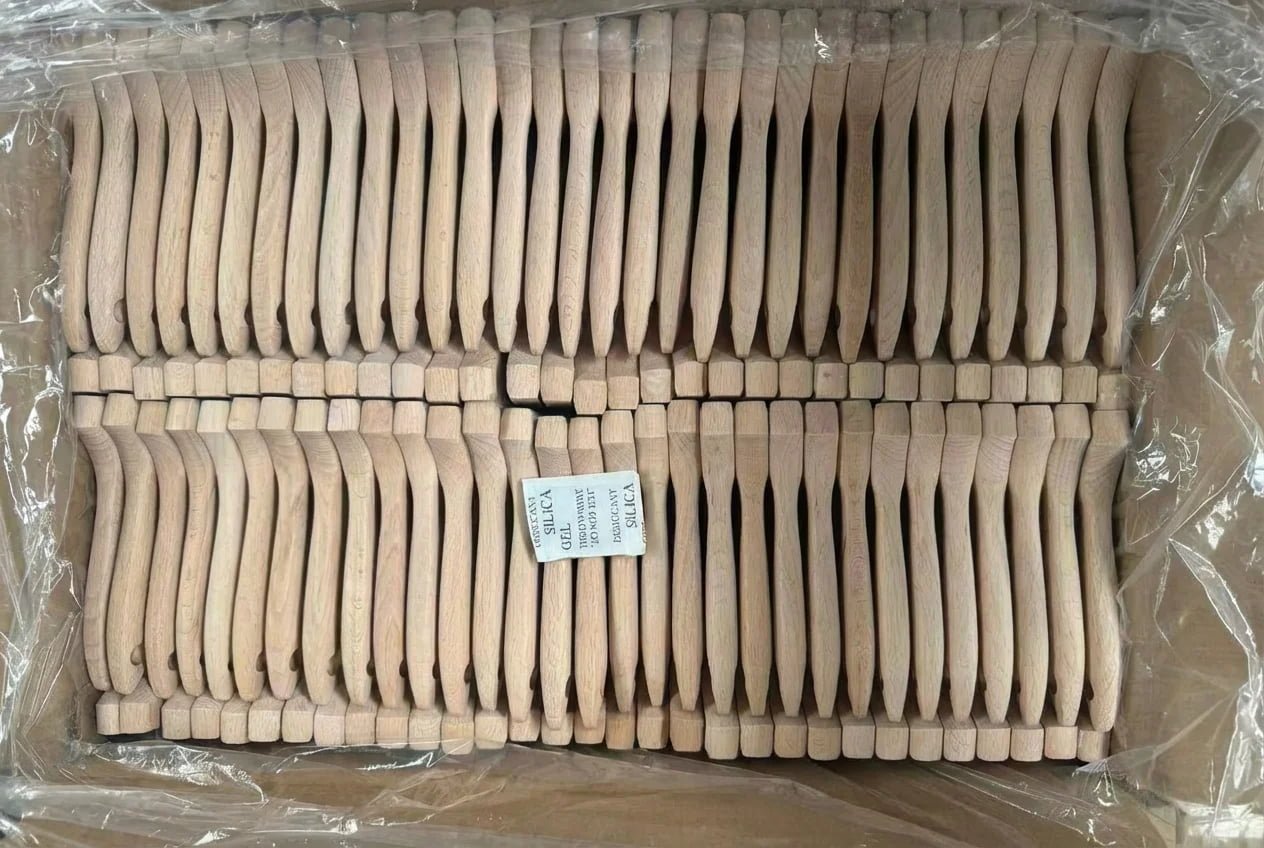
To protect the specified 8-10% moisture content during the 30+ days of ocean transit, we line every carton with a sealed plastic barrier and place silica gel desiccants inside. This prevents "container rain" from re-wetting the handles.
Why Handles Crack on the Ocean
You ship from China to Europe or North America. The ship travels through different climate zones.
- The Heat: In the day, the metal container heats up. The air inside gets hot. Hot air can hold a lot of water vapor.
- The Cool Down: At night, the temperature drops. The metal container cools down fast. The hot air inside hits the cold metal roof.
- The Rain: The water vapor condenses into liquid water. It drips from the ceiling of the container. This is "container rain."
If your handles are just in a cardboard box, the cardboard absorbs the water. Then the wood absorbs the water from the cardboard. The result? You open the box and find mold, blue stains on the wood, and warped handles.
The JDW Packing Solution
To solve this, I implemented a strict packing protocol years ago. It costs a few cents more per box, but it saves thousands in claims.
- The PE Liner: We use a large plastic (PE) bag inside the master carton. The handles go inside the bag. The bag is sealed (taped or tied shut). This creates a micro-climate. Even if the cardboard box gets wet, the wood stays dry.
- Desiccants: We throw desiccant packs (silica gel or clay) inside the PE bag. These absorb any residual moisture trapped in the air inside the bag.
- Stiff Cartons: We use 5-ply corrugated cardboard. Wet cardboard collapses. High-quality cardboard holds its shape.
Read more about prevention of moisture damage in containers.
RFQ/PO wording you can copy-paste
You do not need to be a wood expert to get good results. You just need to write the right contract.
Use clear, specific clauses in your Purchase Order (PO) that define the target moisture content, the measurement method, and the packaging requirements. This removes ambiguity and holds the factory accountable for proper drying and conditioning.
The Exact Text to Use
If you are a "Frustrated Product Visionary" or a technical buyer, copy this text into your next RFQ or PO. It covers all the risks I have discussed.
Technical Specification for Wooden Handles:
- Moisture Content (MC): Target MC is 8%. The acceptable range is 8% to 10%.
- Measurement Method: MC shall be measured using a pin-type meter inserted into the handle head (ferrule seating area).
- Sampling Plan: Pre-shipment inspection based on ISO 2859-1 (GB2828.1), Level SII, AQL 2.5 for moisture defects.
- Conditioning: Finished handles must be conditioned in a climate-controlled environment for a minimum of 3 days prior to packing to ensure core stability.
- Packaging: All cartons must include an inner sealed PE plastic liner (barrier) and at least 10g of desiccant per inner box to prevent moisture ingress during transit.
Why These Clauses Work
Let me break down why I wrote it this way for you.
- "Target 8%, max 10%": We give a target, but we set a hard ceiling. If I see 11%, I know it is risky. If I see 12%, I know it will mold.
- "Conditioning for 3 days": This is a secret of the trade. When wood comes out of a hot drying kiln, it is stressed. It needs to rest. We call this "tempering" or conditioning. It allows the moisture to equalize between the core and the shell. If a factory packs hot wood straight from the kiln, it will sweat inside the plastic bag. The "3 days" rule forces the factory to slow down and do it right.
- "Barrier + Desiccant": This shifts the responsibility of shipping damage. If the goods arrive wet, and there was no plastic bag, it is the factory's fault. If there was a bag and they are still wet, it might be a hole in the container (shipping line fault). This clause protects you.
When I started my own factory, I wanted to combine "European quality with Chinese speed." Part of that speed is getting the order right the first time. Clear specs make that possible.
Conclusion
To prevent cracking, specify 8-10% moisture content, test at the handle head, and demand plastic liners in shipping.